
Your system might have gotten incredibly slow and you might have opened your task manager to realize that Windows Modules Installer worker is using a large percentage of your CPU and you might have caught yourself wondering, “What is Windows Module Installer Worker? and how do I stop it from using up a large percentage of my CPU?”
Page Contents
What is Windows Modules Installer Worker?
Windows Modules Installer Worker is also known as TiWorker.exe or the WMI worker. It is a Windows automatic service tasked with installing new updates to your computer. It enables installation, modification and removal of Windows updates and optional components.
The process can take up more than 50% of your CPU storage sometimes causing the Disk Usage error especially on slow computers with slow hard drives.
If your computer’s fan spin up and your computer gets hot for no apparent reason or your computer slags and slows down, sometimes coming to a halt and even rebooting the system does not seem to help, the Windows Modules Installer Worker might be the culprit.
If you allow it to run, the process eventually finishes and stops using up your CPU and disk resources until the next update. How long the process takes depend on the speed of your computer’s CPU and storage as well as how many updates it needs to install.
If it is a nuisance, and you find that it is slowing down your work, you could try a couple of the fixes listed below:
How To Fix Windows Modules Installer Worker High CPU Usage
Delete the Software Distribution Folder –
Doing this would refresh windows update on your computer. Windows automatically downloads and stores new updates in its software distribution folder, sometimes, these files get corrupted and may result in high CPU usage. If this is the issue, you could fix it by taking the steps outlined below. We stop te windows update first so we do not get any errors while deleting the folder.
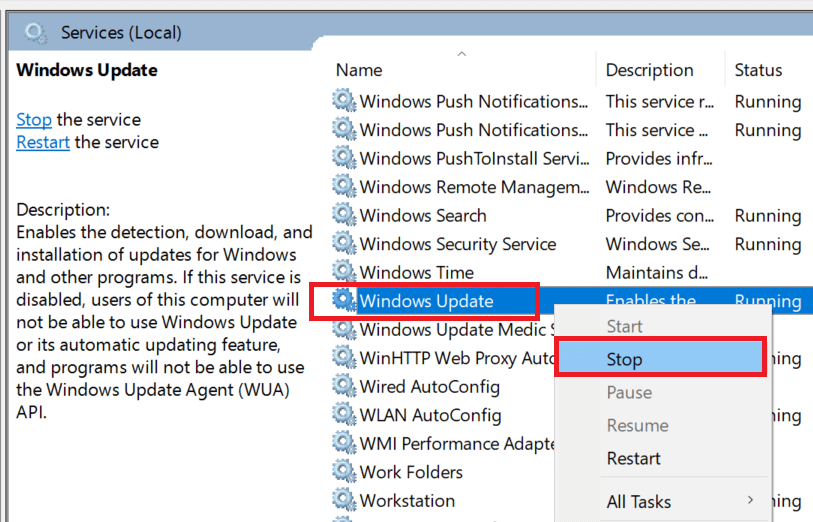
- Press the Windows Key + R to open the Run dialogue box
- Type services.msc and then hit enter
- Right-click on Windows Update in the right-hand side of the service window
- Select Stop
- Close the window and then move on to deleting the folder
- Open File Explorer
- Navigate to Local Disk(C:)
- In the search bar, type Software Distribution
- Right-click on the folder from the search result and select delete
- Reboot your Computer

Run the Windows Troubleshooter –
Some users have found that running the Windows update troubleshooter seemed to fix their issue. To do this:

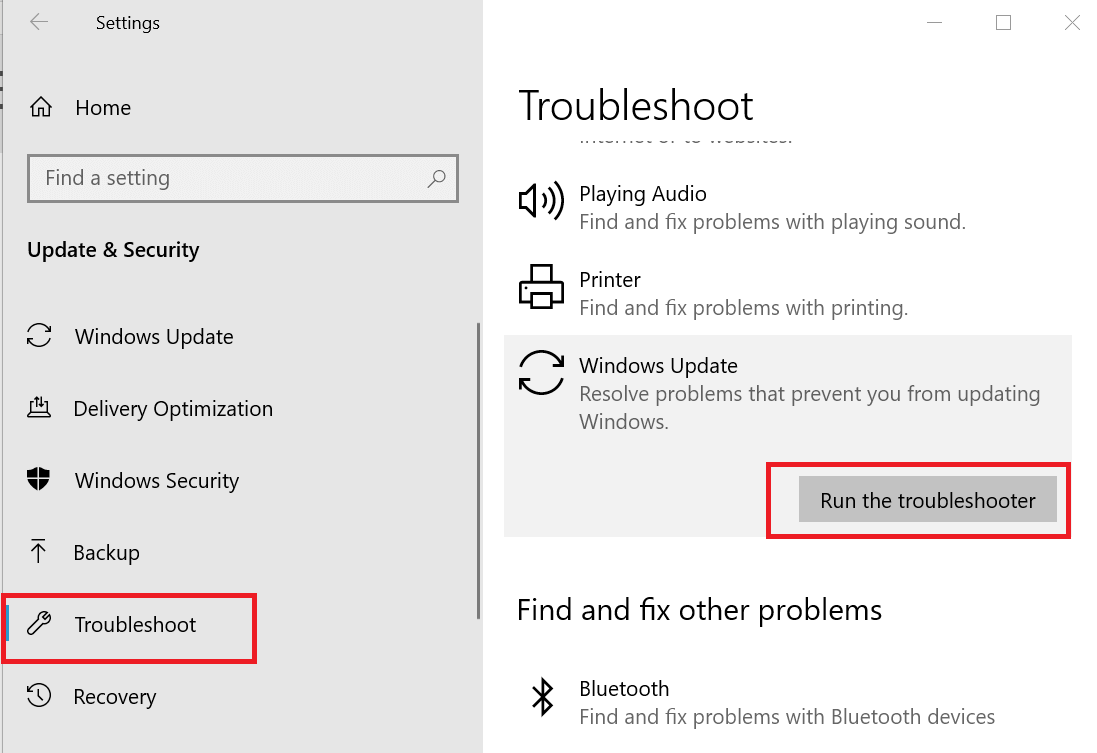
- Click on the start menu on your PC
- Select Settings
- Navigate to Update and Security
- Tap on the troubleshoot tab
- On the right-hand pane, click on Run the troubleshooter under Windows Update
- Follow the on-screen prompts to apply the recommended fix.
- Reboot your Computer
Restart Windows Update –
Sometimes, simply restarting Windows Update can help you fix this issue. To do this :
- Open the dialogue box with Windows Key + R
- Type services.msc
- Right-click Windows Update option
- Select Restart
- Reboot your Computer
Stop Windows Automatic Update –
Although not recommended, you can set windows to update manually. Doing this means that Windows update does not run until you set it to. To do this when you are using wifi network through a hotspot or a router :
- Click on start menu on your PC
- Navigate to Settings
- Tap Network and Internet
- Navigate to the wi-fi tab
- Select your current wi-fi network
- Scroll down to metered connection and turn it on
If you are on an Ethernet connection, you can disable automatic update by :
- Press the Windows Key + R to invoke the Run dialogue box
- Type regedit and then Ok
- Click Yes when prompted by the User Account Control window (UAC)
- Click on the following options chronologically SOFTWARE – Microsoft – Windows NT – CurrentVersion -NetworkList – Default Media Cost
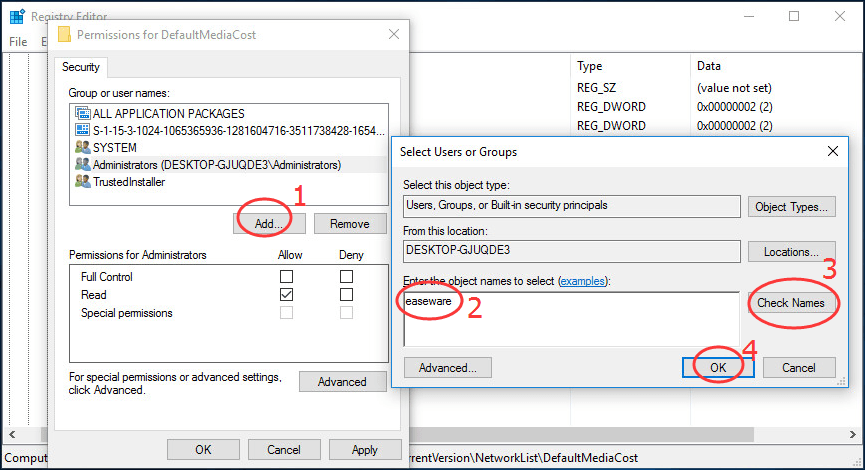
- Rightclick on Default Media Cost and from the options, select permissions
- Select Add and then type your username into the box labelled Enter the object names to select
- Click Check Names
- Click Ok
- Click on the user you just added then under permissions, tick allow for full control
- Click Ok
- Double-click Ethernet to set the value data as 2
- Click Ok and close the Regedit window
- Reboot your computer

Find and Fix corrupted files using the DISM tool –
The DISM tool scans and restores and corruption in your OS automatically. If the issue is related to some files relating to Windows Update being corrupted you can use this tool to restore them. To use this tool:
- Press Windows + X
- Select the Command Prompt(Admin) option
- Click Yes when prompted by the User Account Control window (UAC)
- Run the command on your DISM tool Dism.exe /Online /Cleanup-Image /Restorehealth or Dism /Online /Cleanup-Image /RestoreHealth
- After the DISM tool scans and fixes, any errors found
- Restart your computer and check if your issue has been fixed.
Most users record improvements after using one of the hacks above but some users find that the only thing that works is disabling the Windows Module Installer.
See Also: Modern Setup Host High Disk Usage in Windows OS and Ways To Fix It
Other Questions
Should I disable the Windows Module Installer?
Although this comes heavily unrecommended, you might have to do it if the Windows Installer makes your computer so slow that it is almost impossible to get any work done but before you do it, you have to remember that the Installer helps to keep your system updated and keep your data and OS safe from virus attacks.
To disable it temporarily, which means that after some time or after a reboot, the Windows Installer runs again, You can :
- Push Crtl + Shift + Esc to open up the Task Manager
- Select the Windows Modules Installer Worker Process (TiWorkere.exe)
- Right-click on the options and select End Task to disable it.
To disable it permanently, you have to change the startup settings. To do this,
- Push Crtl + Shift + Esc to open up the Task Manager
- Click on the Services tab
- At the bottom left, click on the open services link
- Find the Windows Module Installer from the list
- Right-click and select Properties
- In the field startup type, choose Disabled
- Click Ok


