
Windows 10 was produced by Microsoft as a member of the family of the operating systems and was brought into the market for users on the 29th of July 2015. Before the coming of the Windows 10 operating system, there where other operating systems, but Windows 10 seems to take things to another level by introducing some amazing features, including its ability to also work on smartphones, personal computers, video game consoles, and HoloLens, which is popularly known as “universal apps”. However, despite these amazing features, Windows, like every other software, has its own shortcomings, and one of them is the issue of Headphones Not Working On Windows 10.
The good news is that users are not left without any solution. Hence, in this article, we will be discussing the solutions and more.
Page Contents
Why Won’t My Computer Recognize My Headphones?
You have just finished upgrading to Windows 10, and suddenly you noticed that your Headphones are Not Working On Windows 10. This is not strange, it usually happens. There are several reasons why this can happen and makes it unable for you to enjoy the sound from your device. But first, before you start getting ideas into your head, unplug your headphone from the computer you are currently using and plug it into another computer, if the problem persists, then your headphone is faulty. But if it works on another computer, then the fault is from the first computer. However, if you want to be fully convinced that the problem is from your Windows 10 computer, insert a few other headphones into it and see if it will work, but if it still doesn’t work, then your Windows 10 computer is confirmed to be the problem.
It could be that after the update, which the original intent is to fix some things, ends up breaking some other parts. This can result in the incompatibility of some drivers with the new operating system, and if it affected the audio driver, there is no way you can be able to play any sound with any headphone on that computer. Like was initially stated, this is not strange, it has been experienced by a lot of users and there is an easy way to fix it
Simple Solutions To Headphones Not Working On Windows 10
There are many ways to do this, and we are going to list some of the simplest, tested and trusted ways to fix this problem.
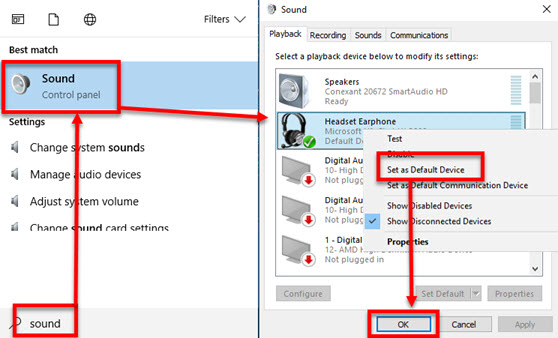
Method 1: Manually set Headphone as default device

Your headphone has to be set as a default device in your computer when you plug it in. But when your computer is not seeing it as a default device, then playing sound with it becomes impossible. The good news is that you can set it manually, and the process is very easy. Just follow the steps below:
Step 1. Navigate to your Control Panel and open it
Step 2. On the top left, change the View by to Category
Step 3. Scroll down to the left and click on Hardware and Sound.
Step 4. On the left, click on Sound
Step 5. Now, inside the Sound menu, you will see a list of devices. Select Headphones and click Set default.
Note: Sometimes, instead of showing only Headphones, it shows Headphones/Speakers. If that is the case, still select Headphones/speakers
Step 6. Click Ok
Method 2: Update the drivers responsible for audio
When your audio driver is faulty as a result of been outdated, definitely there is no way you can be able to play any sound with that computer. You can either choose to do this manually or automatically. To do it manually, follow the steps below:
Step 1. On your computer, navigate to My Computer, or on some computers you will see it as This PC. Right-click on either My Computer or This PC, and then select Properties.
Step 2. Now that the Properties Windows is open, scroll to the left side of the pane and select “Device Manager.”
Step 3. Now that the device manager has opened, scroll through the list and click on the arrow beside Sound, Video and Game controllers to expand it. Under it, right-click on High Definition Audio Device, and then select Properties.
Step 4. On the new High Definition Audio Device Window, select Driver and then click on Update Driver, and press Ok.
Step 5. A Window will appear, asking you ” how do you want to search for driver software?”. Select the option to Browse my computer for driver software.
Step 6. Next is to select Let me pick from a list of device drivers on my computer
Step 7. Select High Definition Audio Device
Step 8. Click next, and say yes to the Update driver warning
Restart your system and check if it’s ok now.
Method 3: Remove the IDT audio device
This method can only be applied if you have DT audio device installed on your computer. If that is the case, then follow the steps below:
Step 1. Navigate to the Control panel and open it
Step 2. Set the View by on Large icon
Step 3. On the Control Panel Window, scroll down to the right side, and click on Programs and Features
Step 4. From the list of the programs and features, select IDT Audio Driver and click Uninstall
Step 5. Finally, you have to restart your computer and then verify if the issue has been resolved.
Method 4: Reconfigure the settings in Realtek HD Audio Manager
If you installed Realtek HD Audio Manager, and the settings were not configured correctly to play sound on headphones, that could result in the problem. To fix it, here is what you have to do:
Step 1. Click to open the HD Audio Manager
Step 2. You will notice a little folder at the top right side of the HD Audio mANAGER window, click on it.
Step 3. In the Connector Settings, select Disable front panel jack detection by ticking on the box and then click Ok
How do I enable headphones on my computer?
To begin to enjoy listening to sound with your headphones on your computer, there are a few steps you have to take to set it up. Here are they:
Step 1. First, plug your headphone into the right port on your computer (The right port usually has the symbol of the earphone on it).
Step 2. In the notifications area of the taskbar, you will see a little speaker icon, that is the volume button, right-click on it and select playback devices, you will see the Sound dialog box appear
Step 3. Inside the dialogue box, click on Speakers/Headphones, then scroll down and click on properties
Step 4. Next, the Speakers/Headphones Properties dialog box will appear. There are about four different taps on top, click on the Levels tab.
Step 5. Click and drag the Speakers/Headphone slider.
Step 6. When you notice a small red circle appear on the speaker button, click on it to enable the headphone.
Step 7. Use the balance button to balance the sound
Step 6. Click ok to close all the dialogue boxes that are open
Note: This method is for Windows 10 computer
See Also: Ways To Fix No Internet Secured Error In Windows 10 (Updated)
Why do my headphones sound weird on my computer?
There are many reasons why your headphone sound will suddenly start sounding weird. However, we can put these reasons under three different categories, and they are a problem with your computer, a problem with the headphone itself, and a problem with the headphone cable.
Some latest computers that are in the market today, has inside of them what is called Sound card, and this sound card is fixed to the motherboard. This has left the sound card exposed to other components inside the computer, such as the CPU, graphics card and many more. When these other computer components start interfering with the sound card, it can cause a weird sound.
When the connector on the cable is bad, it prevents it from connecting well with the audio source, thereby distorting the sound.
Also when the headphone speakers are bad, it can emit a distorted sound.


