
It can be very frustrating when your Internet Keeps Disconnecting or going on and off. It becomes even more frustrating when you call your Internet Service Provider (ISP) for support and they keep you on the queue for a very long time. What if we tell you that that you can actually fix the problem on your own? It’s no rocket science, the solution to the problem might just be staring right at you, but because of the lack of knowledge, you seem to find yourself in a state of confusion. That is why we want to guide on the steps you can take to fix the problem without a sweat.
But before proceeding to the solution, lets first take a look at the possible causes of the continuous disconnection of your internet.
Page Contents
Reasons Why Your Internet Keeps Connecting and Disconnecting:
Weakly Wifi Signal
It could be that your WiFi hotspot is not strong enough, or that your device is far from your router. This could cause your wifi signal strength to drop.
Excess Load On WiFi Network
It could also be that Wifi network is carrying a lot of loads, it means that there are lots of devices currently using that particular Wifi network, probably more than it can carry. This is mostly the problem in some public places, where there are a lot of people using one particular wifi network.
WiFi networks Interference
It could be that other WiFi hotspots within your location are interfering with your own hotspot, especially when they are both using the same frequency, wireless channel and are closeby.
Outdated Drivers
It could be that the Drivers of your network adapter are outdated or that the firmware of your wireless router is outdated.
Issue With ISP
It could also be a problem from the side of your Internet Service Providers. If your ISP is having any issue, there is every possibility that it will affect their internet service. In that case, it’s not your fault.
How To Fix Internet Keeps Disconnecting Issue
Now that you are aware of the possible reasons why your internet is continuously connecting and disconnecting, let’s get into the solution proper. Below we have listed methods you can use to fix this problem on your own without stress.
Method 1: Reboot Everything
Before you get into altering some serious settings on your device, we suggest that you try out some of these “first aid” treatments. It might not be a serious problem after all.
To Reboot also means to Power-cycle. You will have to reboot all the equipment you are using, including modem, router, laptop, phone, etc. Most routers and computers, when they work for a very long time, they will start to malfunction. So restarting it might bring it back to normalcy.
Method 2: Forget WiFi Network & Reconnect
This method has helped to fix a lot of internet-related problems. And its very simple. There are several other methods to achieve this. Follow the steps below:
Step 1. On the bottom-right corner of the taskbar, click on the Wi-Fi button. This will reveal a list of the available networks around you.
Step 2. Right-click on the name of the particular network you want to delete.
Step 3. Choose the Forget option
Method 3: Update Wifi Driver

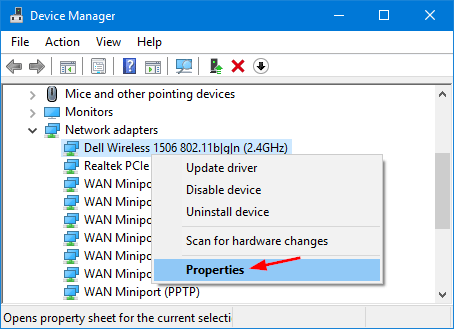
An outdated wifi driver can cause this problem. So update your network driver and see if it fixes the problem. You can choose to go to the official website of your device manufacturer and download the updated version from there, or you can use the device manager on your Windows 10. To update using your Devive Manager, follow the steps below:
Step 1. Open the Run box by pressing Windows logo key and R at the same time on your keyboard.
Step 2. Type “devmgmt.msc“, into the Run box and press Enter
Step 3. Double click on Network adapters to widen the list
Step 4. Locate your wireless network adapter and right-click on it
Step 5. Select Update driver
Method 4: Adjust the Speed and Duplex Mode of Network Card
Sometimes you need to modify the Speed and Duplex settings in order to improve the performance of your computer network. This method can also be used to troubleshoot problems that have to do with network. Follow the steps below to do this:
Step 1. Open the Run box by pressing the Windows logo key and R altogether.
Step 2. Copy this (control /name Microsoft.NetworkAndSharingCenter) and paste it into the run box and click Ok.
Step 3. On the new Window by the left, click on Change adapter settings
Step 4. Locate your network adapter and right-click on it and then click on Properties
Step 5. A new tap will show containing the properties of your network adapter, on the top left, click Configure
Step 6. Next is to click on tap labeled Advanced
Step 7. Scroll down and click on Speed & Duplex
Step 8. Select 10 Mbps Half Duplex as the value. Click Ok
Check and see if the problem has been rectified
See Also: How To Fix Power Surge On The USB Port In Windows 10
Method 5: Adjust Your DNS settings
DNS means Domain Name System. When you subscribe to an Internet Service Provider (ISP), they also the DNS addresses available to you. This is what enables you to have access to websites, different online services and also to download files. Sometimes the servers tend to be slow and unreliable, and you might want to consider changing it. There are many ways to change your DNS setting, but in this article, we will show you how to change it through your control panel To do this follow the steps below:
Step 1. Scroll to your control panel, right-click and open it.
Step 2. Click on Network and Internet and then on Network and Sharing Center
Step 3. On the left side, click on Change adapter settings
Step 4. Right-click on the network adapter, that is network interface connected to the internet and then click Properties
Step 5. Tick the Internet Protocol Version 4 (TCP/IPv4) and again click the Properties button
Step 6. Now is the time to put change the DNS server addresses. So click on the option to Use the following DNS server addresses.
Step 7. Now type-in the DNS addresses you want to use.
Below are DNS addresses of Google Public DNS, OpenDNS, and Cloudflare
- Google Public DNS: 8.8.8.8 and 8.8.4.4
- OpenDNS: 208.67.222.222 and 208.67.220.220
- Cloudflare: 1.1.1.1 and 1.0.0.1
Step 8. Click Ok and Close button
Once the process is complete, your device will automatically switch to using the new DNS settings. Check to see if the problem has been resolved.


